


Jewellery is a go-to gift — it’s something special, thoughtful and you can choose the perfect piece to suit the style of those close to you. The joy of a locket necklace is that it adds that unique and personal touch.
It’s a timeless and classic piece of jewellery, which holds tiny yet special locket photos of loved ones and allows the wearer to carry their nearest and dearest with them wherever they go. In this article we’ll show you how to print locket necklace photos.
Locket’s come in gold and silver and many shapes and sizes, from heart shaped lockets to round, faceted and oval lockets. Because they’re often given as gifts to mark special occasions like births, weddings or milestone anniversaries they can hold a lot of sentimental value. However, you don’t need a special occasion to gift someone (or yourself!) a beautiful locket. And these days you’re not constrained to choosing from the simple, classic shapes that lockets are known for – there are many different options for finishes, metals and designs.
The trickiest bit, however, is getting the right size locket photos printed. And that’s where PostSnap comes in, because as a professional photo printing service we specialise in locket photo printing. Our locket photos offer you perfectly sized little locket pictures ready to insert into your pendant.
The days of having to cut up your 6x4 prints and find a face small enough to fit your locket are well and truly over.
Keep reading for everything you need to know about locket photographs, from selecting, measuring and trimming your locket sized photos to the optimum size and shape to printing your photos direct from a phone and then fitting them into your new pendant locket.

Step 1: Choosing the right photo for your locket.
Lockets are unique pieces of jewellery that people hold close to their hearts, so the photo you choose to go inside it will hold special memories and meaning. In our experience people often choose to use a sentimental photo of family, friends or even a beloved pet. Take your time to choose the perfect photos for lockets and keep in mind that you may need to crop your photo to optimise it for your photo locket.
Here are some tips on how to narrow your options down:
* Choose a photo that is not too busy or detailed – the easier it is to isolate your person’s face in the image the better. Plus, any tiny bits of detail will be lost in a very small photo so don’t worry too much about that.
* Make sure the photo is not too dark - well-lit photos are the ones we’re looking for!
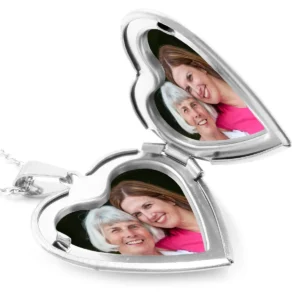
* Don’t forget to consider the impact of the shape of the locket on your picture. For example, if your pendant is heart shaped, your photo print will have the inverted point at the top of the heart and right in the middle of it. Plus, remember that what works well in a heart shaped locket, may not work as well in a round or oval shaped locket.
* Confirm that the image will still be recognisable in a small locket. Locket pictures are usually of loved one’s faces – choose an image that has been shot quite close up, rather than from a distance, so all their features are defined and visible.
* Bear in mind that head shots with some background are a great choice. If there are two people in the shot, make sure their heads are close together. Because locket pictures are so small, it’s best to avoid large group photos — save the big family photos for a large photo print or a personalised photo card.
* Remember that as with any photo, the better the quality of the image, the better it will look when printed. High resolution images work best, but most smartphones provide enough megapixels to capture the ideal resolution, even for printing mini locket sized photo prints.
* Don’t have any important parts of your photo near the edge of the photo as these may be cut off when you trim your photo to fit the locket photo area.
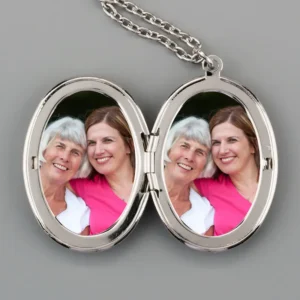
* For lockets which hold photos in both sides, you can choose two images. You may decide to select two separate photos, or crop and split subjects from one shot.
* Make sure that after cropping the image you’ve chosen has the subject in the centre and enough background around the face or faces, so that it’s the background, not the subject, that gets lost if the photo needs to be trimmed.
Step 2: Measuring your locket for the right locket sized photos.
You are probably asking yourself what size are locket photos? The truth is there is no standard size because each locket is different. Lockets are manufactured in different materials, in a range of shapes and to different sizes. However, most lockets will have space for at least one small locket picture, and sometimes two and getting the size of the actual photo print right is important.
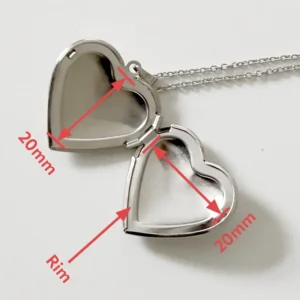
The majority of locket pictures require photos of around 15 to 25mm x 15 to 25mm (1.5 to 2.5cm x 1.5 to 2.5cm) but not all jewellery pieces are the same and so it’s important to measure the locket template or locket itself accurately.
With PostSnap’s locket photo creator you need to enter the maximum dimensions of the photo area of your locket in order to generate a square or rectangular photo to roughly fit the size of your locket and which you then trim to final size and shape when the printed photo arrives in the mail.
Our photo prints are designed to fit virtually any size of locket or pendant. Some lockets are supplied with a little paper template inside and this makes it easy to measure the two dimensions and trim your photo to shape but if you don’t have one don’t worry as you can measure the locket itself to get the two dimensions and you can also create your own locket template to assist in trimming your photo to shape later.
To get the measurements for your locket photo print if you have a template, lay the paper template supplied with your locket on a flat surface and using a ruler measure the widest and highest points in millimetres.
Tip: A typical photo for a locket measures around 20mm +/- 5mm at its widest and highest point. These are the two measurements you need to input when you order your locket prints online.
Enter your measurements in millimetres and order your locket photo prints straight from your phone, tablet, or PC. If you have measured your template in centimetres or inches you will need to convert your measurements to millimetres before entering the dimensions into the locket prints page of the PostSnap website. Remember that 1 centimetre = 10 millimetres and 1 inch = just over 25 millimetres.
Once you have recorded the relevant width and height measurements put your template aside to use again when your pendant photos are delivered. If you don’t have a template supplied with your locket, you’ll need to make your own. This is relatively easy and involves measuring the width and height of the locket photo area and adding half the width of the rim if it has one.
If the locket doesn’t have a rim simply measure the widest and highest parts of the photo area of the locket. Keep in mind that if you measure the widest and highest part of the locket itself (rather than the photo area) you will need to trim off more of the photo print so that it fits the photo area.
Therefore, to create your locket template open the locket clasp and lay the open locket on a flat surface and measure the widest and highest points of the photo area and add half the width of the rim on each side from the two dimensions (for the typical locket you generally add 2mm to each dimension for the rim (2 x 1mm on each side).
Tip: The rim runs all around each side of the locket and is usually around 2mm thick.
These are also the measurements you need to input when you order your locket print online. You can enter your measurements in centimetres or inches and order straight from your phone, tablet, or PC. Now create your locket template using the two dimensions.
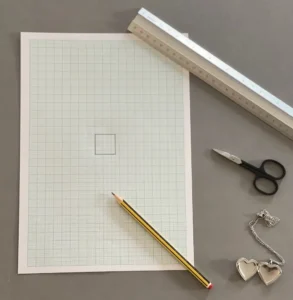
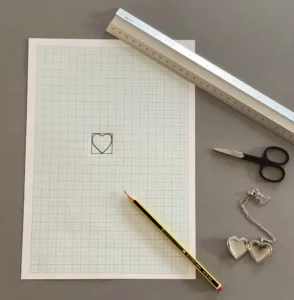
We first create a square or rectangular shape using graph paper to help ensure the drawing is accurate and to assist with sketching the locket shape afterwards. Having used your measured dimensions to draw a square or rectangle on the graph paper using a good quality sharp pencil. Once complete put the graph paper to one side whilst you sketch out the shape of your locket using tracing paper.
Place a small piece of tracing paper over one side of your open locket and carefully sketch around the shape of the rim or photo area if it doesn’t have a rim. You should now have a heart, oval, circular, rectangular or square shape dependent upon the shape of your locket which needs to be transposed on to the graph paper within your square or rectangular box. To do this turn the tracing paper over and put your sketched shape within the box. It may help to tape the tracing paper to the graph paper to hold it in place. Trace over your heart shape for example to leave the heart shape within your box. Using a pair of sharp, curved nail scissors cut out the template and put it to one side until your locket picture prints arrive.
What you’ll need:
* A ruler or tape measure in millimetres
* A pencil
* Tracing paper
* Graph paper
* Sharp curved nail scissors
Step 3: Printing locket photos from your phone.


Now you have your locket template and the width and height measurements required to create your locket photo prints we get down to the business of printing your chosen picture(s) as square or rectangular shapes. At PostSnap we’ve made it as easy as possible to print locket photos for which fit your pendant.
Here’s how:
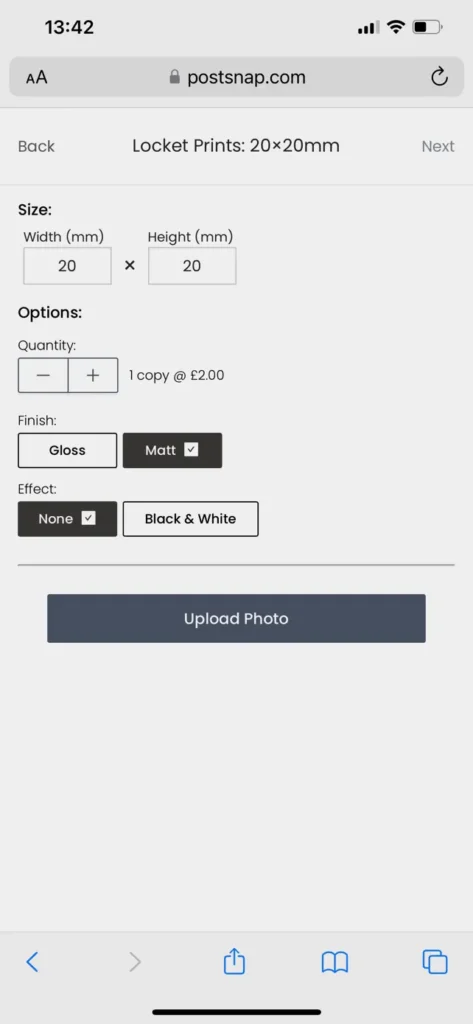
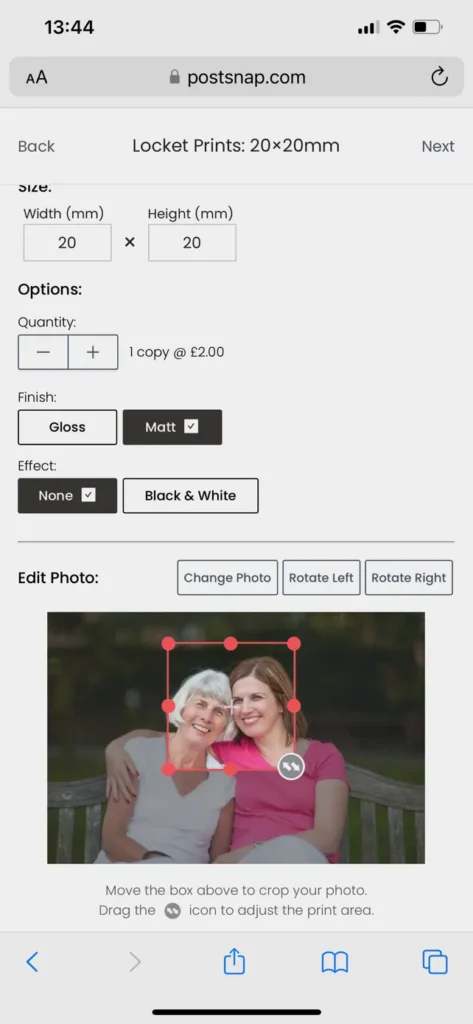
1. Navigate to Locket Photos – this is where you’ll find everything you need for getting those locket photos printed.
2. Hit ‘Get Started’ and input the width and height dimensions you measured. Remember to take into account trimming the edges once it’s been printed, and double check you’ve got the right unit of measurements – millimetres. You don’t want to print in inches when you really meant millimetres!
3. Choose whether you want your pictures printed in full colour or black and white, and with a gloss or matte finish (tip: matte usually works better in lockets).
4. Upload your photo!
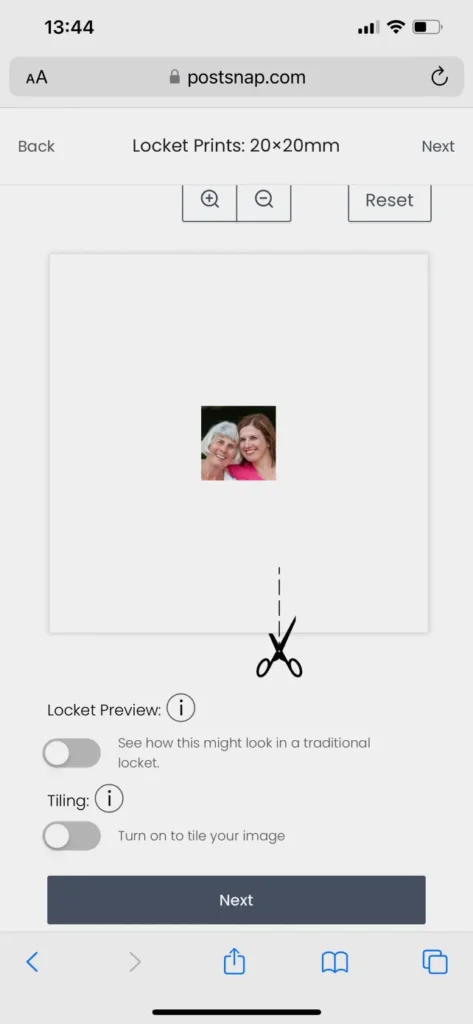
5. Once the photo is uploaded, you’ll be able to move the red crop box to make sure you are getting the right crop for your locket. You’ll also be able to see a preview of your image below.
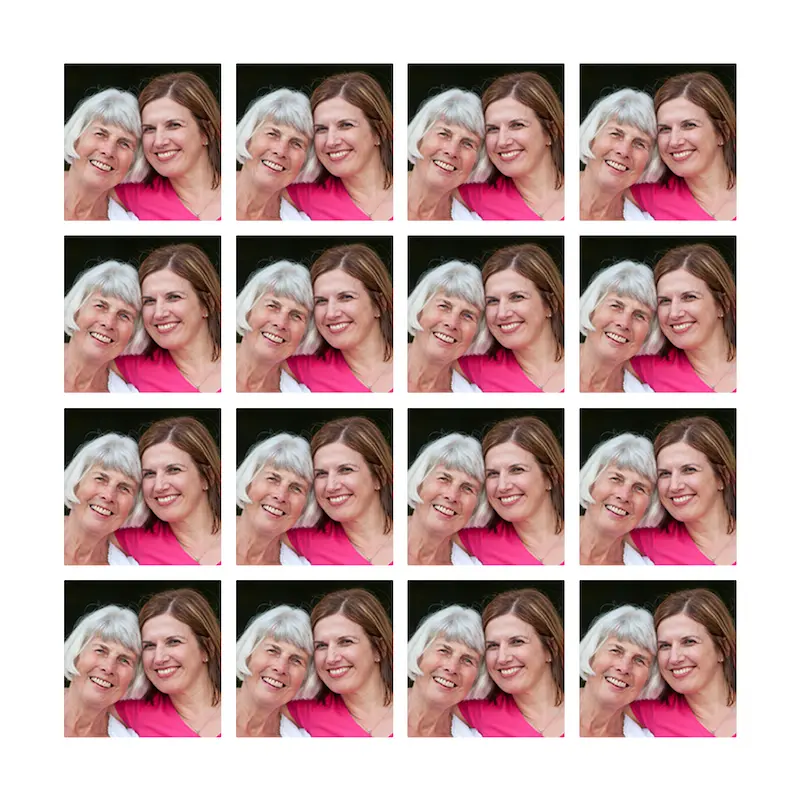
6. This step is important so don’t skip it! Make sure you flick the ‘Tiling’ toggle on. This multiplies your image across the print so that you have lots of copies of your cropped photo to experiment with sizing and trimming when it comes to actually fitting the picture into the necklace.
7. Approve your print and check out.
Remember that at PostSnap we print square and rectangular shaped photos and so you will need to trim your photo print to its final shape and size when it arrives.
Step 4: Trimming and fitting your locket photo prints to fit your pendant.
Once your prints have arrived, all that’s left to do is trim them and pop them in your picture locket. This is where your little template comes into its own.
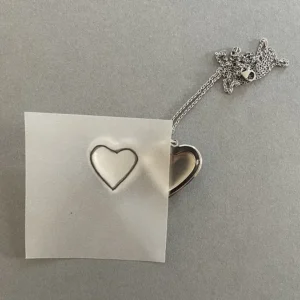
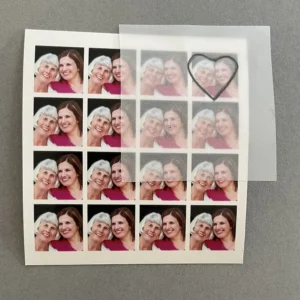
Place your template over on of your tiled photos and trace around it with a pencil to get a faint but exact trim line.
Tip: using curved nail scissors or really sharp embroidery scissors will get nice clean edges if you are creating a curved shape such as a heart, oval or circle.
Remember to trim evenly from all sides so that the subject remains central. Don’t worry if it takes a few tries to get the size right, this is exactly why we recommend tiling your print – so you’ve got lots of backup photos.
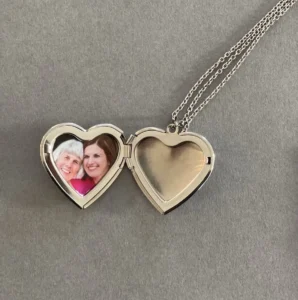
Once you have cut out your photo print Insert the little locket photo print into your locket and press gently around the rim at the edges using a pointed or slanted tweezers until it fits underneath the lip of the locket.
The rim should hold the photo in place but if it doesn’t or your locket doesn’t have a rim you can add a small blob of glue to the back of the print before you inset it into the locket.If there are any folds or creases, or the shaped photo print is too large, you should carefully re-trim small slivers off the edges of the print until it fits smoothly.
What you’ll need:
* Sharp curved nail scissors
* Tweezers - Point tweezers work best
* Photography glue or glue dots
Other creative ideas for locket sized photos.
Miniature photos can have other uses, too. Why not throw a few in with your Christmas cards to give family and friends a visual update on your year? If you’re giving jewellery as a gift, you could place a tiny photo inside the box to add that extra personal touch. Or simply carry a selection with you in your purse or wallet.


.webp)


